 Jenkins
Jenkins is an open source Continuous Integration tool that monitors execution of repetitive jobs, such as building a software project or jobs ran by cron. It’s written in Java programming language and designed to test and report on isolated changes in a larger code in real time.
It is Originally started as Hudson in 2004 but due to a dispute in 2011 they forked and continued under the name, Jenkins.
It can be used to build software, deploy software, or websites to various endpoints or to run unit/behaviour-driven software tests.
So the builds on top of Continuous Integration are Continuous Deployment and Delivery where after the successful tests you will be able to run, instantly and automatically release with the latest version of your codebase. We can say Jenkins makes deployment a non-issue and helps you speed up your development.
Basically, we can say that “Jenkins is a Continuous Integration server which is the best practice of running your tests on a non-developer machine.”
By this article you can learn step by step that how to install, configure Jenkins, and how to create your first job. After setting up the basics, you’ll schedule the build on specific times and install a plugin.
So, let’s start the setup of Jenkins on Ubuntu 14.04 LTS operating system.
Java Installation
Now install the Java first through the apt-get package manager. For this purpose, you will need to install open source implementation of JAVA Version 7. This is quite easy to do so by executing the command below.
sudo apt-get install openjdk-7-jdk -y
It will take a few minutes to complete the Java installation. Once it is done, run the command below to check the installed version of Java on your system as shown.
java –version
System Update and Installing Jenkins
First of all we have to add the key and source list to apt. This is done in 2 steps,
first we’ll add the key.
sudo  apt-get  update

sudo wget -q -O - http://pkg.jenkins-ci.org/debian/jenkins-ci.org.key | apt-key add -
Secondly, we’ll create a sources list for Jenkins.
sudo echo deb http://pkg.jenkins-ci.org/debian binary/ > /etc/apt/sources.list.d/jenkins.list
Now, we have to update apt’s cache before we can install Jenkins.
sudo apt-get update
As the cache has been updated we can proceed installing Jenkins. Note that Jenkins has a big bunch of dependencies, so it might take a few moments to install them all.
sudo apt-get install jenkins

The installation process will end up with starting its daemon.
To check the status of Jenkins service, the command below will
show you its status with running process ID.
Jenkins service run with its default user name jenkin sudo service jenkins status
Now that Jenkins is running on port 8080 by default for HTTP connector, go to <Public_IP>:8080.
Now type Password which have to copy from /var/lib/jenkins/secrets/initialAdminPassword with root user.
sudo -i

cd /var/lib/jenkins/secrets/

ls

cat initialAdminPassword

jhtu67vsiuhid89bdjcbi89cc1244abch
After That you can change your password from “Jenkins Dashboard ”
Jenkins Configuration
Jenkins will be launched as a daemon up on start. See /etc/init.d/jenkins for more details.
The ‘jenkins‘ user is created to run this service.
- Log file will be placed in /var/log/jenkins/jenkins.log. Check this file if you are troubleshooting Jenkins.
- /etc/default/jenkins will capture configuration parameters for the launch like e.g JENKINS_HOME
- By default, Jenkins listen on port 8080. Access this port with your browser to start configuration.
If your /etc/init.d/jenkins file fails to start jenkins, edit the etc/default/jenkins to replace the line
HTTP_PORT=8080
by HTTP_PORT=8081
Here, 8081 was chosen but you can put another port available.
Setting up an Nginx Proxy for port 80 -> 8080
This configuration will setup Nginx to proxy port 80 to 8080 so that you can keep Jenkins on 8080. Follow the command step by step
Install Nginx
sudo apt-get update

sudo apt-get install nginx -y
Configuration

sudo  cp   /etc/nginx/sites-available/default /etc/nginx/sites-available/jenkins cd /etc/nginx/sites-available

cd      /etc/nginx/sites-available/

sudo rm  default ../sites-enabled/default
configuration for Jenkins Make sure to replace ‘example.com’ with your domain name.
Note: Sometimes your permissions (umask, etc) might be setup such that this won’t work. Create the file somewhere else then copy it into place if you run into that problem.
Comment out the server_context or all lines or you can create new file for jenkins configuration and Copy the content from below
cd /etc/nginx/site-available

sudo  vim  jenkins

upstream jenkins_server {
    server <private_IP>:8080 fail_timeout=0;
}

server {
    listen 80;
    listen [::]:80 default ipv6only=on;

    server_name localhost;

    location / {
        proxy_set_header X-Forwarded-For $proxy_add_x_forwarded_for;
        proxy_set_header Host $http_host;
        proxy_redirect off;

        if (!-f $request_filename) {
            proxy_pass http://jenkins_server;
            break;
        }
    }
}
:wq (save and exit)
Link your configuration from sites-available to sites-enabled:
sudo ln -s /etc/nginx/sites-available/jenkins /etc/nginx/sites-enabled/
Restart Nginx
sudo service nginx restart
Now that Jenkins is running with Nginx Proxy on port 80 which is redirecting on 8080, go to <Public_IP> or with you domain_name from browsers.
Jenkins GUI Configurations
To use and configure Jenkins, visit the following address in your browser
You will be its welcome screen where you will be able to configure its different parameters for your system.
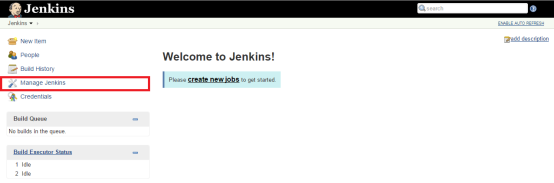
Click on “Manage Jenkins” and then choose the required parameter to start required configurations.
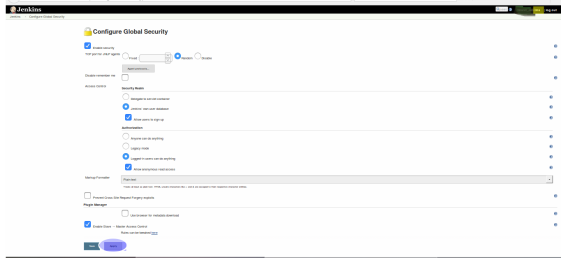
Jenkins Security Setup
Consider enabling authentication to discourage misuse by configuring Jenkins global security parameters and then apply to save the changes as shown.
Jenkins Plugin Management as per your requirement
We will use Jenkins Plugin Management to add, remove, disable or enable plugins that can extend the functionality of Jenkins.
To install plugins in Jenkins, select the “Manage Plugins” link and search for the plugin you want to install. Select it from the list and click to download and install button.

Check the option to Restart Jenkins when installation is complete.
Example: Disk Usage Plugin We’re going to install a plugin that keeps track of the disk space used by different builds and jobs. This makes it easier to look for space eaters. To get started, go to “Manage Jenkins” again. And click on Manage Plugins:
Look for the “Disk Usage” Plugin and select it:
Once your done, click on the Install, Just wait until the plugin has been installed and it’s ready for use.
Go back to the top page
(you can start using the installed plugins right away)
Now you can Schedule your new jobs, click the “New Item” from Jenkins Dashboard then enter a name for the job and select “Freestyle Job”. Press OK to create a new Job. Configure your job as per your need.
“Jenkins is an incredibly powerful tool. It is incredibly powerful tool with a lot of flexibility, and to be honest, it’s really hard to complain about an enterprise level build server for free.“

Your website has to be the eloecrtnic Swiss army knife for this topic.
LikeLike
That’s the pefecrt insight in a thread like this.
LikeLike
Hello How to Install and Configure Jenkins on Amazon EC2, Cloud-Ubuntu 12.04, 14.04 LTS – Linux_Point
* With us, you get all the marketing tips and tools you need to:
– Driving Traffic to your Website, Product or Project !
– Find your audience, build a relationship and sell your products !
* We value your privacy and would never spam you: http://bit.ly/Email_Money_Online
LikeLike